Thursday, 1 February 2024

Spectrum Secrets

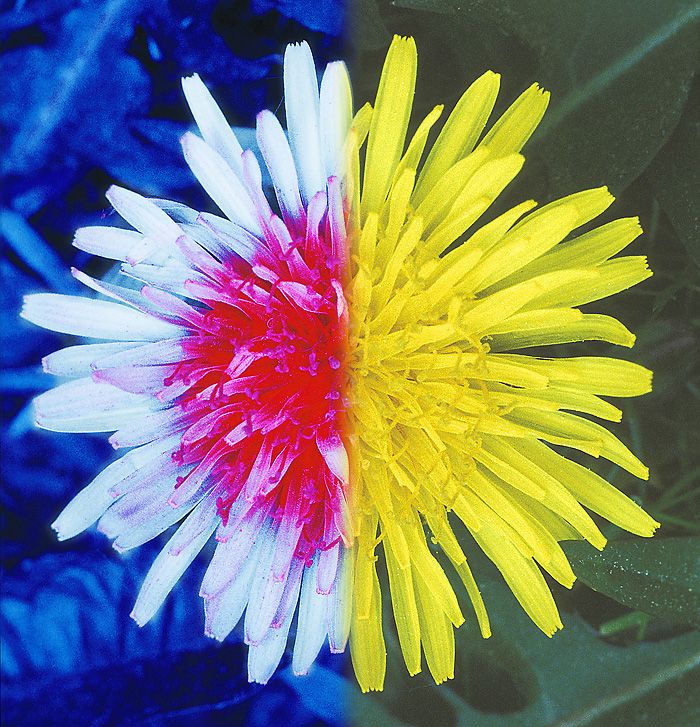
For this challenge of "Patterns in Nature," I wanted to present those patterns that are outside the range of human vision, but are visible to birds and insects.

Sdixon27, CC BY-SA 4.0 , via Wikimedia Commons 

Using batik fabrics, and glow-in-the-dark and neon threads, I managed a "four-for-one" look: under ordinary light, you see orange flowers with pale butterflies on the front, and dark blue flowers outlined in orange with colorful butterflies on the back. Then under black light, both front and back reveal different lines and colors.

Spectrum Secrets, front, under daylight


Spectrum Secrets, front, under black light.

Spectrum Secrets, reverse, under daylight.

Spectrum Secrets, reverse, under black light.

I should note that the threads and paints I used didn't produce all the color effects I was hoping for, so I gave up on any scientific accuracy and just had fun.  

I enjoyed working on this, and you can read more about the exact materials I used at my home blog, www.textileranger.com .  That is a WordPress blog and it has a great "image compare" feature with a slider, and I think it's a better way to view these pictures, so I hope you drop by!


Patterns in Nature: Freckled Frog

This was a fun prompt. My quilt was inspired by the Northern Leopard Frogs we encountered while hiking in Fort Ransom State Park in North Dakota. This is my original photograph. You can see more pictures from our hike at that link I've given you.


Using the photograph, I went to work rendering him into fabric. These are time-consuming, and they can be frustrating. This one actually went together more easily than anticipated. When he was finished, he looked like this. 


Then, I created a background for it. 


From there, I peeled him up off the teflon pressing sheet and fused him to the background.


Then it was ready for quilting and binding. First, I went to work thread-painting and stitching down the edges of the frog.


That was done just through the quilt batting and prior to adding the back.


When it was finished, it looked like this:


Searching through my stash, I didn't have a fabric I liked for the back. I went searching online and found the perfect back for the frog. The rest of the quilting was done after the back was added.


And then I went to work quilting a place for the frog to live...and some friends to have over for dinner.


This is my rendering of a dragonfly.


Also, he wanted some lilypads and cattails in his pond.


On both sides, if you don't mind.


When the quilting was finished, I found this binding in my leftover binding scrap bag.


The quilt was actually all finished and hanging on the wall. Every time I entered the sewing room, I felt as if it needed something else on the right side. And so I carefully fused this rising sun (or setting sun...not really sure), and quilted in a few rays.


And then I could call it finished. 


I hope you like my quilt. It finishes up at 17 x 22 inches. 

Patterns in Nature


Project is a table runner. I saw this process on a video from Sew Steady. The flowers and leaves are done using a template ruler.


Then the flowers and leaves are colored with colored Inktense pencils. After the color is applied, I used a fabric textile medium to set the colors and seal them. 


As you can see, I did sew into the border and then cut out the section of flower that intruded. 

The butterfly was one that I freehand drew and transferred onto the fabric, sewed with black and then colored the same way. I don't really care for the butterfly and have tried placing a different one on top but it didn't work. Have thought about cutting that section out but I don't think the time is worth it;(


Patterns in Nature

 My Patterns in Nature piece is based on this photo. 


I have always been fascinated by a stand of trees. The long straight lines reaching up to the sky. I want to go stand amidst them (and have). This particular stand of trees are birch trees seen on an overcast day while in northern Minnesota. 

My finished quilt measures 19" x 25.5" and is very simple. I worked with monochrome colors in white and shades of gray. The background fabric is Moda Grunge in Metropolis Fog. 


Before I began this little improv piece, I had to think a bit about how to arrange the branches to give the appearance of trees close together. Once I got that figured out in my head, I enjoyed an afternoon or two of piecing. 

For the quilting, I just went with straight line piecing in the tree trunks, using thread to match. Then I decided to try to add some shadowy trees using grey thread in differing shades. 


I stitched these freehand, without doing any marking. It was pretty easy to do. Here's another view. 


I backed the quilt with the same Grunge as used on the front, and added a faced binding. 


More challenging than making the quilt itself was trying to get decent photos. Our weather has been very overcast and gloomy, so that really affected the light in my quilt room. 

I enjoyed this Patterns in Nature challenge, and I am enjoying my little stand of birch trees. I'm looking forward to the next challenge! 

Wendy

Saturday, 4 November 2023

New Theme


 Thank you everyone for all the fantastic ‘Circles and Squares’ quilts. I’m trying to post this from my phone so, if it turns out oddly, I will edit! 

The Random Generator Wheel has chosen Patterns in Nature’ for next time. 

So please post your next art quilts for 10.00am GMT on 1st February 2024. I can’t wait to see what everyone will come up with and, in the meantime, have a happy quarter :)

Wednesday, 1 November 2023

A Little Bouquet

As usual, my thoughts and ideas for this theme challenge were all over the place, but I finally settled on using this image as inspiration. 


 This is a favorite coffee shop in my city. I enjoy it for the fun latte art (the coffee itself isn't my favorite) and the lovely little floral bouquets at each table. The floral bouquet is the inspiration for my quilt, but the coffee comes into play just a bit, too. 

I decided to challenge myself to see if I could make a little floral bouquet using all circles and squares. It was quite fun, although I had to think a bit on how to incorporate squares! Here's my finished bouquet. 


The blue fabric used for the table is actually an old chambray shirt my husband used to wear. My initial idea for this challenge was to use a larger piece of that shirt and add circles and squares to it. I started by adding coffee rings and was going to stitch around them, but then the rest of that idea just wouldn't settle in. However, I thought having a table with coffee rings was a fun idea (the actual tables at the coffee shop are pristine, in case you were wondering). 


Hopefully you can see those coffee rings in that photo. From there, I built the bouquet, using only circles and squares. The vase is two squares on point, set on top of a half-circle. The bouquet itself is a mix of circles and squares - I just let my imagination run. 


The pieces are all cut freehand. They were stitched to the quilt top using raw edge nachine applique, which got a bit wonky in plaees, but worked out okay enough for me. Rather than using batting for this piece, I used fusible fleece, which I fused to the background before I added the bouquet. Once the bouquet quilting was done, I added the backing to the quilt top and finished with some free motion quilting. It didn't occur to me to do circles and squares in the free motion quilting, so I just practiced a bit of my free hand, which still needs a lot of practice! 

The backing is a scrap piece of blue from my stash, and I had to add a striped binding to add a finishing little pop to the quilt. 


This was a fun challenge for me because I had never tried that free motion quilting around circles. It was a little bit of a challenge at first, but I may have to mess with it a bit more. I always learn some new technique with each challenge. 

Wendy


Classic Car Dashboard

This theme threw me for a loop!  I just couldn't think of anyway to make "Circles and Squares" interesting.

Then I remembered that years ago, when my husband was part of a car club, we got to tour a private car collection.  I loved the arrangements of the dashboards and they were crammed with circles and squares, so that would make a perfect subject.

In creating for these challenges, I have three main objectives: come up with an image I like, try at least one technique that is new to me, and use some of the great supplies in my stash.

Beautiful design in a vintage car.

Out of all my dashboard photos, I thought this one had the best balance of circles and squares, and the partial circles were a twist that I would not have thought on my own.

I have no idea what kind of car it is from because I only took pictures of the dashboards! 

Classic Car Dashboard

All the fabrics I used were from my stash.  I had bought a fat quarter bundle of a SAQA collection for Andover Fabrics in 2017, and I used mainly three of those fabrics -- the dark one with orange blotches, the gold one with brown ripples, and the gold and blue one with the raindrop circles.  

As I thought about appliqueing the circle shapes, I didn't look forward to satin stitching all the edges.  Fortunately I remembered a book on my shelf that showed a landscape with lots of curves -- Dream Landscapes: Artful Quilts with Fast-Piece Applique, by Rose Hughes.  Her method is to use couching to cover all the raw edges, so that was the new-to-me technique for this piece, and I really liked it.  I used knitting ribbon, bias tape, and weaving yarns to outline the various gauges and dials. 

I also had an assortment metallic threads from WonderFil, that came in a box of supplies I got in an online auction, and I used them in straight, zigzag, and satin stitch.  I used a needle for metallics, set the tension very low, and used a stabilizer.  The threads did break now and then, but not too often.

Detail showing some of the metallic threads.

This is definitely one of my favorite pieces of my Endeavourers collection.  And there are other dashboard photos from that tour waiting to be turned into art quilts too. :)


Something Old, Something New

Today is the reveal for "Circles and Squares." I had only about a month to work on mine, and so I needed something I could do quickly. During the month of August, I was finishing up sewing together the blocks for my Vintage Linen quilt top. I'd made crazy quilt blocks using some of my grandmother's vintage dresser scarves as the center pentagon.

And so I had some of my grandmother's doilies and dresser scarves scattered around the room. I noticed this one. 

It was probably made to put at the top of a chair back, to protect the upholstery from the oil from someone's hair. I didn't think to take a picture until I'd already started taking it apart, but I think you can get the idea what it looked like when she made it.

My grandmother inspired me to learn to quilt. She was long gone by the time I learned, but she was the quilter I knew growing up. Her quilts were all hand-pieced and hand-quilted. She had a heart condition, and she was required to be lying down all but about 4 hours out of any given day. That meant she kept herself busy doing needlework, including embroidery and crochet. She could pick up the tiniest crochet hook and start stitching...no pattern, no nothing. She just crocheted until she had created something lovely and delicate.

Well, okay, so I found those little circular pieces, but what could I do for squares? Then I remembered this fabric I'd picked up in our travels. I'd selected it for a certain purpose, but then ended up doing something completely different. (How many times have you done that?) And it seemed I could use the two things together somehow.

So, I cut apart an appropriate number of squares. (I liked those little messages on the selvage edge too.)

First, I laid out the blocks. They seemed a little boring until I added the brightly colored buttons, which also counted as circles.

And then I used a zigzag stitch to stitch the doilies to the fabric...like you would for applique.

And then, I sewed all the blocks together.

And then, I added this pretty quilt block batik to three sides and the button jar panel to the fourth.

For quilting, I selected this variegated thread. It had all the right colors.

And then I quilted it with a simple dot-to-dot motif.

In the border, I quilted a sort of square stipple, and then I sewed on the buttons.

When the quilting was finished it looked like this.

I used another pretty pastel batik for the binding.

And then my quilt was finished!

I used this sewing-themed fabric on the back. My quilt was created by two quilters: my grandmother and me.


So, I hope you like my quilt. It isn't one of my more inspired creations, but I'm happy to have found another way to incorporate my grandmother's needlework into one of my projects.

 Grandmas hold our tiny hands for just a little while…but our hearts forever. ~ Unknown

Moon Over Squircle


For this challenge, I used some silk scraps that I have collected over time but never done anything with.


I used the same collage technique as last time and I really enjoyed seeing the beautiful shapes that emerged from basically putting colour into a grid - although I decided, in the end, not to actually mark the grid and that allowed me to take a little poetic license with the moon! I have put more details over at Rainbow Hare.

I'm looking forward to seeing what everyone has made for this challenge :)