How to write, save, label and publish a post
[Updated 23.2.18 to correct some typos and make a few tiny clarifications. Updated 3 May to clarify Scheduling]
31 JANUARY 2021: Blogger has changed the appearance of some menus, so this page needs to be updated, but I have updated the Scheduling info, and I'm putting a copy temporarily at the top of this page until I can check and update the rest, which I'll do asap :-). Catherine
Scheduling your post:
Finally, schedule your post. Below is a close up of what you should see when you are writing a post. You can set scheduling before you have written your post, during, or afterwards, using the 'Published on'' option, that you will see below 'Labels' in the menu to the right of your post. (It may also sometimes read 'Schedule')
Here's a close up.
Click on the downward arrow. Below is what should appear, and you need to click the 'Set date and time' option. A calendar will appear, with. the current date and time. You will change this, using the calendar.
Once you have done this, you can safely hit Publish - and your post will appear on the right day at the time you put in. If you don't hit Publish, your post will remain in Draft.
If you look back to that side menu, as below, you will see that under the Published on, and 'Permalink' there is a 'Location' option.
If you click this, you can pinpoint your location on the map. If you click on UK, the post should publish UK time. If you select your own location, it will publish at that time in your own time zone. Selecting UK obviously means that your post will publish along with the rest without you having to work out what time 10 am in the UK is in your own time zone - it is up to you what you choose to do! :-)
SOME OF THE INFO BELOW NEEDS TO BE UPDATED, AND I WILL DO THAT ASAP.
Below is an image showing part of what you should see on the front page of this blog when it is open in your browser. You'll see that up at the top right hand corner of your page there appears the option "New Post".
Click that. What you should see is below. See where it says 'Post Title'? That is, not surprisingly, where you can type the title of your post. You can change it later if you want but it's helpful to title it first. And the blank page in the middle is where you can type your post itself. Just click your cursor on the page and begin. You can use the icons in the row above this page to format your post - for bold, underline, text alignment etc.
So far, so good. So you may have got as far as typing some text - and now you want to put in a photo. Look back up at the row of icons at the top of your page. Part of it looks like this:
See that little picture to the right of 'Link'? Click that.
A dialogue box will open which looks like this:
You'll see that you have the option to upload pics from various places including your computer, or Google photos if you use it. Just choose the one you want and the subsequent steps are self-explanatory, I hope. Having inserted an image into your text you can centre or size it by clicking on the image and choosing options from the dialogue box which opens. You can also remove it. You can add images one at a time or severally, and move them around by dragging and dropping.
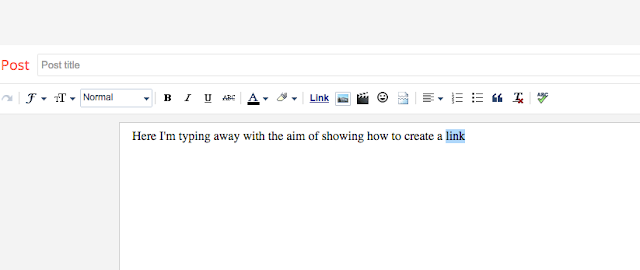
Next, you may want to create link - to your own blog, for example. Double click on the text you want to turn into a link, as below.

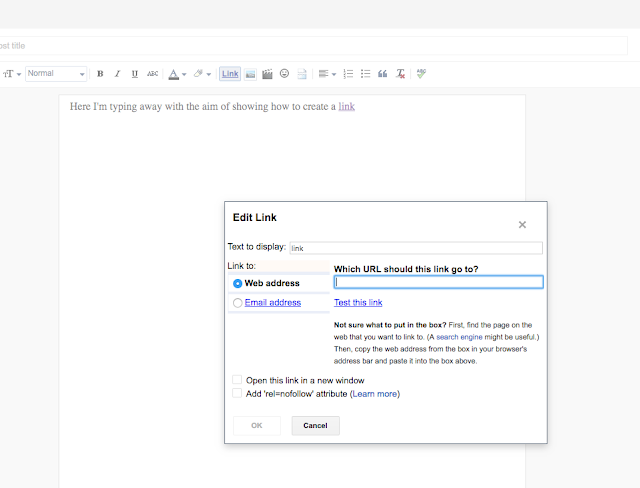
Then, unsurprisingly, you want to click the Link icon as below, when a dialogue box will open. Fill in the required URL, test that it works if you want by clicking 'Test this link', then click OK. The dialogue box will go away and a link will have been created.

At any stage you can save your work by clicking the 'Save' option, towards the top right (a reminder of what you're looking for is below). Your work will be saved as a draft and you can keep working on it. Don't hit 'Publish' yet!
You can also preview your work - see the 'Preview' button? It will open up a new tab in your browser and show you what your post will look like.
Assuming all is now okay, you can add labels to your post. These will be added to the list of Labels under the Contributor's list on the home page of the blog. Click on the 'Labels' button as below.
A box will open and under it you will see some labels which have already been created. You can use any or all of these:
or add your own:
Click 'Done' when you're finished. You can label the post with your first name, with the relevant theme, with any particular technique you've used, and etc - anything to help people to search for posts on a particular topic or by a particular writer. See below, where I've just used my name.
Scheduling your post:
Finally, schedule your post, using the 'Published on'' option, that you will see below 'Labels' in the menu to the right of your post. as below.
Here's a close up. You can set scheduling before you have written your post, during, or afterwards.
Click on the downward arrow. Below is what should appear, and you need to click the 'Set date and time' option. A calendar will appear, with. the current date and time. You will change this, using the calendar.
Once you have done this, you can safely hit Publish - and your post will appear on the right day at the time you put in. If you don't hit Publish, your post will remain in Draft.
If you look back to that side menu, as below, you will see that under the Published on, and 'Permalink' there is a 'Location' option.
If you click this, you can pinpoint your location on the map. If you click on UK, the post should publish UK time. If you select your own location, it will publish at that time in your own time zone. Selecting UK obviously means that your post will publish along with the rest without you having to work out what time 10 am in the UK is in your own time zone - it is up to you what you choose to do! :-)
If you have completed and scheduled your post, click 'Publish'. Your work will publish at the correct time. If you think you may want to keep editing, click 'Save' instead. Click 'Close'. You can check that your post is in either the 'Scheduled' folder or 'Draft' folder by going to the home page of the blog. Next to the 'New Post' button we found before, there's a 'Design' button. If you click that you'll go to a screen which looks like this:
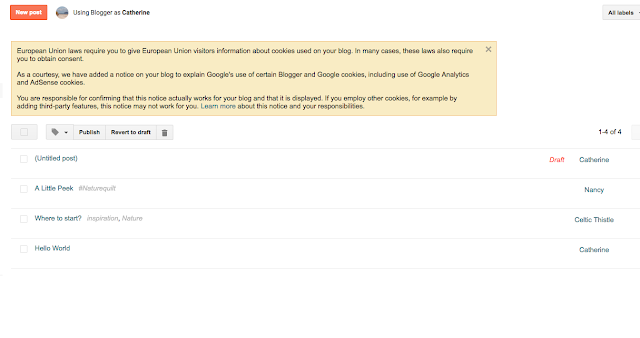
If you click on 'Posts' you'll see a list as below - and you can see that I have one marked 'Draft' in red. Similarly if it was a scheduled post it would show as 'Scheduled'

If you have created, saved and closed a post you can open it up for further editing by going to the home page of the blog, as we've just done. As before, click the 'Design' button, next to the 'New Post' button.
Click 'Posts' to see the list of posts. If you hover your cursor over the title of your own post you can see a list of options appear (Edit, Preview, Share, Delete). Click edit to return to your post and update it. Don't forget to save it and if you have scheduled it, click Publish to complete - if you don't it will revert to Draft.
I hope that I've managed to make this comprehensible. It's not as complicated as it may seem and you can't do much disastrous, bar accidentally delete your own post, or forget to publish it! (Or publish it accidentally, in which case you can see that the options above include a 'Revert to draft' option) If in any doubt, or if you have any problems or questions, please don't hesitate to contact me, Catherine.


Thank you, these instructions are very clear!
ReplyDeleteIt's a wonderful tutorial. Thank you!
ReplyDelete-Soma
I looked for the place where it says "new post" but it isn't there - what I see is "dashboard".
ReplyDelete