
Wednesday, 9 November 2022
New Theme Announcement
Thank you for all the amazing Boustrophedon quilts.
I expect that wasn't something most of us ever expected to make but I thought the theme inspired an incredible collection of different ideas and creations.
We only have one suggestion left on our list now so Mr Random can take a break this quarter!
Our next them is: Portrait (of self/family member/pet/famous person) or a reproduction of a famous painting.
The deadline for this theme is February 1st 2023 at 10.00am GMT but remember you can always put up your post earlier and Schedule it.
In the meantime, you are welcome to share your thoughts, ideas and progress here on The Endeavourers Blog.
Happy Sewing!
Tuesday, 1 November 2022
Bustraphedon - Back and Forth
I am a bit of a word geek, so when I happened across the word "bustraphedon" in a book, I kept thinking what fun it would be to create a quilt with that word as the theme. I had a plan in mind for this theme. My finished quilt is nothing like that plan. In the end, I went with a literal approach, using the early 17th century Greek definition "as an ox turns in plowing".

I decided to play a bit with flying geese units to create movement indicating the back and forth of the oxen and farmer plowing the field. The farmer and oxen is a freehand sketch using an online silhouette as a guide. I fused the farmer and oxen to the quilt top and straight stitched around the outline to secure it.
For the quilting, I went with straight lines for the sky, which I think helps with the movement idea. I was a little reluctant to quilt the lines over the farmer and oxen, but it seems to work just fine.

When quilting the ground, I followed the curves of the improv piecing using a variegated brown thread, which blends in with the lighter brown and is more visible on the dark brown, adding yet more movement for the eye to follow.
.jpg)
I managed to make the entire quilt with fabrics from my stash. I was a bit puzzled about the color for the farmer and oxen, but I think the gray fabric works okay.
This challenge theme was more difficult than I anticipated. I'm curious to see what the rest of you have come up with!
Wendy
Boustrophedon: Curves Ahead
There were so many obstacles to my finishing this quilt, I wondered how I would be able to get it completed in time. First, my sewing room was dismantled toward the end of July after a plumbing catastrophe. The leak was discovered in April, and since then, we've been plagued by slow insurance adjusters and slow contractors. It's been very frustrating.
When the prompt was announced at the beginning of August, we already had plans to leave on a two-month road trip. Our return wasn't expected until October 17th, and so there was just a small window of time for me to work on it. I decided my best bet was to hand embroider something while we were on the road, and then finish it upon our return. My hand embroidery was inspired by this image created by "ndgmtlcd." I've contacted him or her. I don’t know if “ndgmtled” is a man or a woman, but in any case, I’m using the image with permission. I'm grateful to "ndgmtled" for allowing me to adapt it for my purposes.
I had some ideas about how to make it work for the prompt, and so I traced it onto a background fabric and went to work hand-stitching. This is my finished quilt. Mine is a literal interpretation of the prompt. It measures 15 x 18 inches.


and then just lightly quilted it with some straight-line quilting.


With so many challenges, I decided to call my quilt "Curves Ahead."
Every which way with curves!
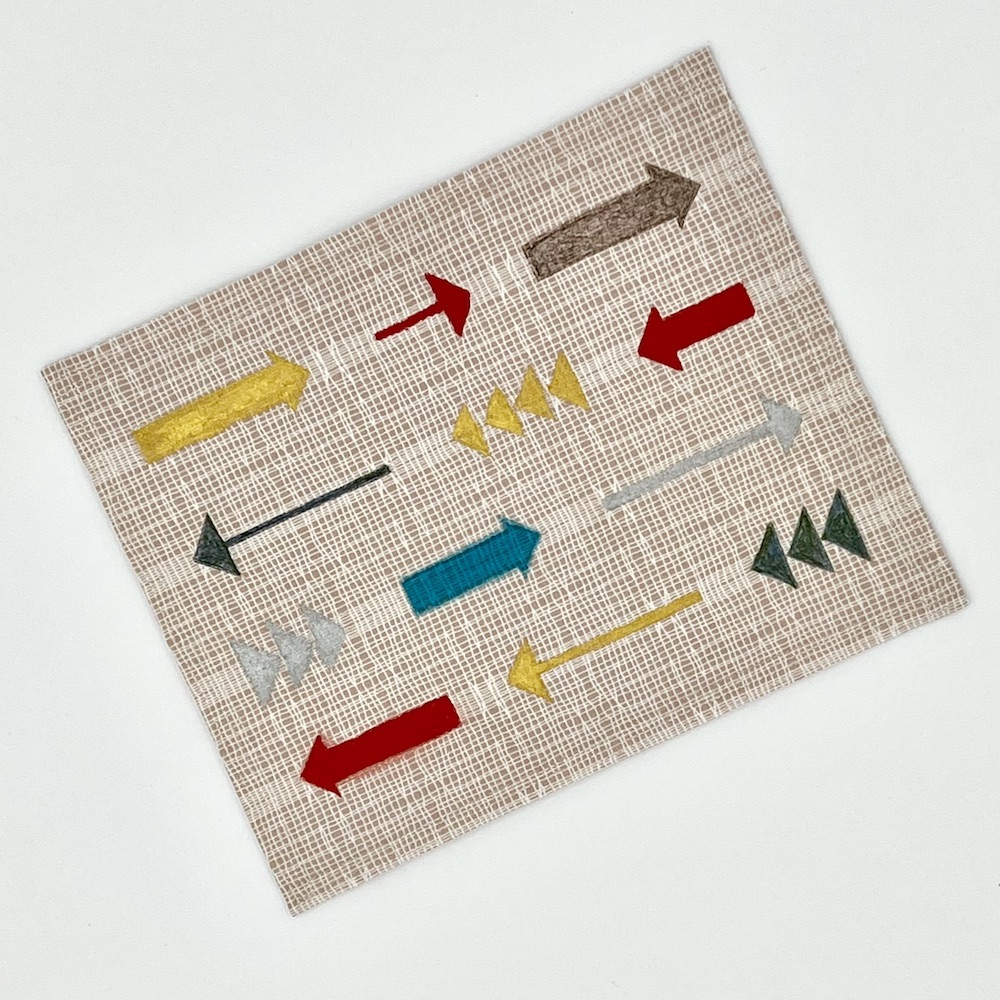
Boustrophedon - won't lie, I had to look this one up. Text that goes one way in line one and the opposite in line 2. I love writing and stories, not so great with languages but they intrigue me, so I am a bit taken by written texts especially how cool looking ancient writings are. I did think of trying something with Ogham (language of the druids) but surprised myself by not using text at all. I started playing with curves.

So this one was more of a jumping off point rather than an end destination. The idea of changing directions in alternate rows using mirroring seems to have taken a hold of me and I had a lot of fun playing.


So I went back to the drawing board and simplified the colour and settled on this design:

Must be the quilter in me but I think I ended up with a quilt block as the symmetry works great left to right and top to bottom and when tiled looks like this:

And in other colours like this:

Next was how to test it and make it? I had planned on curved piecing and had just competed a workshop with our branch of the Irish Patchwork Society, so had learned a new way to piece curves and it would be perfect for this. Bit of a hiccup with this plan - we're laying new floors so that means, painting skirting boards so that means painting the walls and yes painting the ceilings too!

So to make this design and see if it worked, I had to handsew. For some crazy reason, instead of old fashioned piecing or applique, I decided to use EPP. The block comes together in two ways:


And yes you can EPP curves but getting all the points to match with EPP in the centre was where I came unstuck.

After all the hand sewing, sorry to say I ran out of time to quilt it, so I left the papers in and framed it!

Not sure if this meets the brief, but I missed our last challenge due to surgery, and I got the all clear last Thursday and didn't want to miss this one, so I am posting about a framed two layer piece (fabric and papers!), not exactly a quilt.
I had so much fun playing, exploring, testing and making- really looking forward to what everyone does with this theme. Thanks for a brilliant challenge!
Boustrophedon

I'm really looking forward to seeing what everyone has made for this interesting theme :)
All Hallows return
I hope that I am not the only one who had to look up the meaning of this quarter's theme :) I toyed with all sorts of ideas of picture quilts, colour-coded quilts and variations on those themes but, in the end, I went with the timing of the reveal and created this cushion for Halloween.

I found this lovely poem "Halloween" by the American poet John Kendrick Bangs here and used the first verse for my cushion. The text was written out freehand with a Frixion pen and it took some doing to get all of my letters correct on the backward lines!

The d's and b's were particularly confusing :)
Three words - All-Hallows, moonlit and Jack-o-Lantern have been embroidered in glow-in-the-dark thread to add to the spookiness, I keep forgetting to check to see if it works :)


Ghosts and witches hats were quilted in the 4 corners of the cushion, but they weren't as successful as I had hoped. The witches hats are hardly visible, and if I was doing them again I would probably pick them out in orange or neon thread instead.

On a recent trip to visit our new granddaughter I bought this pumpkin cotton fabric, which was perfect for the back of the cushion. I couldn't find a cushion insert of the right size in the local store here in France, but they did have cushion stuffing so I just stuffed the cushion and hand-stitched it closed.

Now I not only have another decoration for future Halloween's but I have also learned the meaning of boustrophedon, what a brilliant group this is!
Looking forward to seeing all of the other interpretations of this interesting theme.
If you would like to see what else I have been stitching up for Halloween head on over to Celtic Thistle Stitches to have a look :)
Quilt Quest: The Game
My first idea for our Boustrophedon theme was to represent a grocery store, where I wander up and down the aisles in boustrophedon fashion. But then I got the idea to do a game board like the classic Chutes and Ladders game, but based on art quilts.
So here it is: "Quilt Quest"!
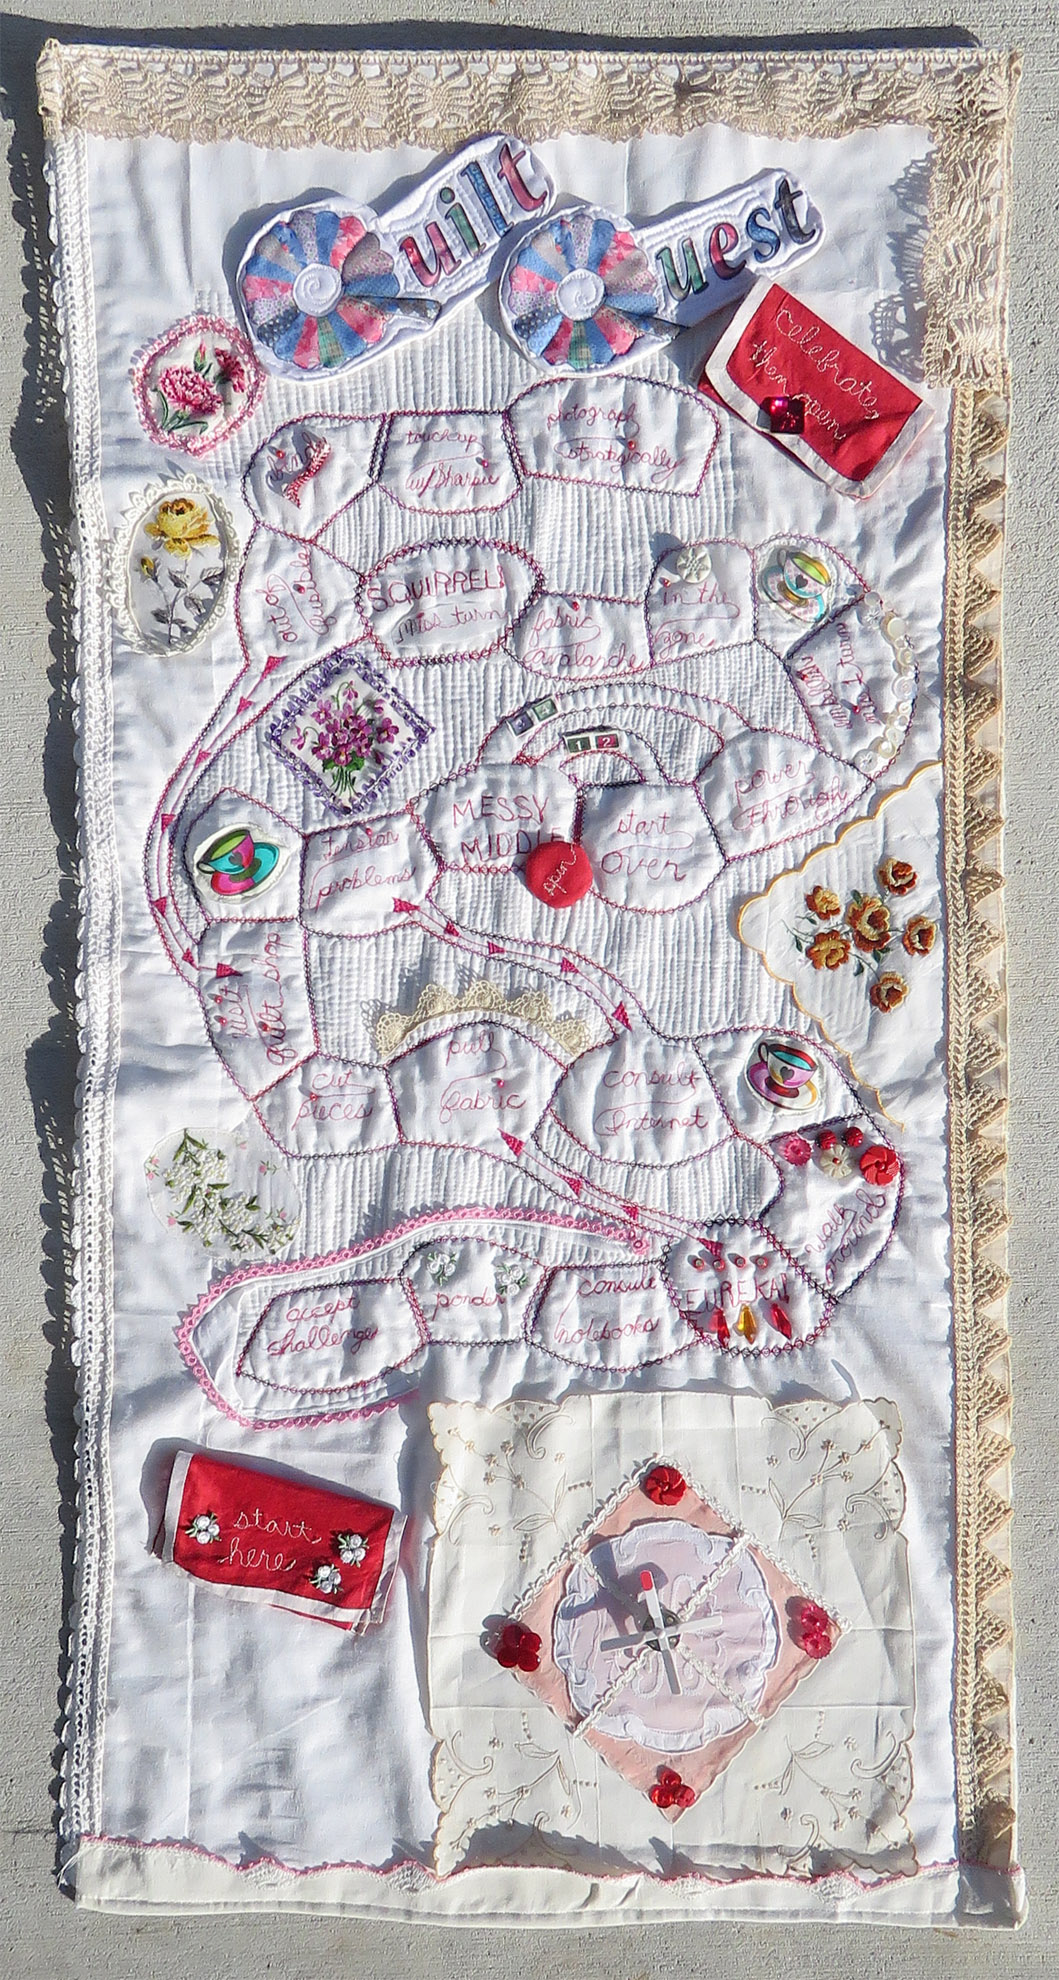
 |
| Playing pieces. |
The playing pieces were taken from a child's souvenir blouse from Greece, circa 1965.
 |
| Spinner made from vintage napkin, coaster, bobbin, buttons, and toy propeller. |
There is a spinner to tell you how many spaces to move. You start at bottom left and proceed to the right; then the next row goes right to left, etc. But just as in Chutes and Ladders, you may land on a space that gives you a short cut forward, or takes you backward.

When you get a good idea -- "Eureka!" -- you can proceed directly to "pull fabric."
But if you land on "tension problems," you have to go back to "consult Internet."
When you get to the "messy middle," you must spin. If you get a 1 or a 2, you must start over. But if you spin a 3 or a 4, you get to "power through" and keep going with your project.
 |
| Here our Greek dancer gentleman has powered through the Messy Middle of his project. |
There are a few places you can lose momentum and have to sit out for a turn -- whether you land on "embellish" or if you land on the dreaded "SQUIRREL!"

And if you make it through all the hazards, you open the red envelope at top right to receive your prize:
 | |
| Your prize -- a chance to nourish your creativity by going through the whole process again! |
I think this game should be played with a timer going, because in real life knowing that the deadline is approaching determines a lot of our choices! I wanted to do much more embellishment on this piece but I ran out of time.
As always, I think of these challenges as something to spark creativity, and I love the process. If I were ever going to submit one of these projects to a show, I would start all over and do everything neatly. I loved the ideas that sprang up while I was in the process of working on the spaces and the possible paths through the game.
And if you would like to read the complete list of game squares, please visit my home blog, Deep in the Heart of Textiles.
Boustrophedon - muffins

Red dots represent the cranberries, brown is for chocolate and yellow for the bananas.

Banana Chocolate Chip Muffins
1 cup AP flour
¾ cup whole wheat flour
¾ cup sugar
1 teaspoon baking
powder
1 teaspoon baking
soda
½ teaspoon
salt
1 egg
½ cup canola
oil
½ cup plain
yogurt
1 teaspoon
vanilla
1 cup mashed
bananas (2-3 medium)
4-6 oz. cranberries,
cut in half
¾ cup
chocolate chips
Mix all
ingredients together except for the cranberries and chocolate chips. When mixed
thoroughly, add cranberries and chocolate chips. Place into muffin tins lined
with paper cups and bake at 350° F for 22-25 minutes.
Monday, 8 August 2022
New Theme Announcement
Thank you to everyone who submitted an 'Animal Kingdom' quilt. This theme inspired a fantastic collection of different ideas and creations. We only have two suggestions on our list, now, but they are both very interesting ones and I'm sure they will inspire some amazing quilts.
1. Portrait (of self/family member/pet/famous person) or a reproduction of a famous painting.
2. Boustrophedon
I used the fun random generator wheel again (found here: https://tools-unite.com/tools/random-picker-wheel) and it chose:

So our new theme is 2. Boustrophedon and I can't wait to see what everyone will make in response to this one.
The deadline for this theme is November 1st 2022 at 10.00am GMT but remember you can always put up your post earlier and Schedule it.
In the meantime, you are welcome to share your thoughts, ideas and progress here on The Endeavourers Blog.
Happy Sewing!
In the meantime, you are welcome to share your thoughts, ideas and progress here on The Endeavourers Blog.
Happy Sewing!
Janine :)
Monday, 1 August 2022
I Otter Be Better Constructed
Initially I was going to create some deep sea creatures for this theme, but then I saw the awesome work of Bryony Rose Jennings, so then I wanted to try a 3D creature myself. But nothing too complicated!
We have very occasional visits from river otters, and that seemed like an easy animal to make.
 |
| An otter in our pond, in 2011. |
I wanted to capture its spiky fuzz, and I would have loved to use fabric and lace bits like Bryony does, but I had limited time. So I made a basic soft toy, then stitched loops of recycled sari silk yarn to long thin strips of fabric, and arranged those around the otter's body. (I am now thinking I may have been influenced by the header image on this blog!)
 |
| A very basic otter body made out of batik fabric. |
 |
| A colorful otter on the shoreline. |
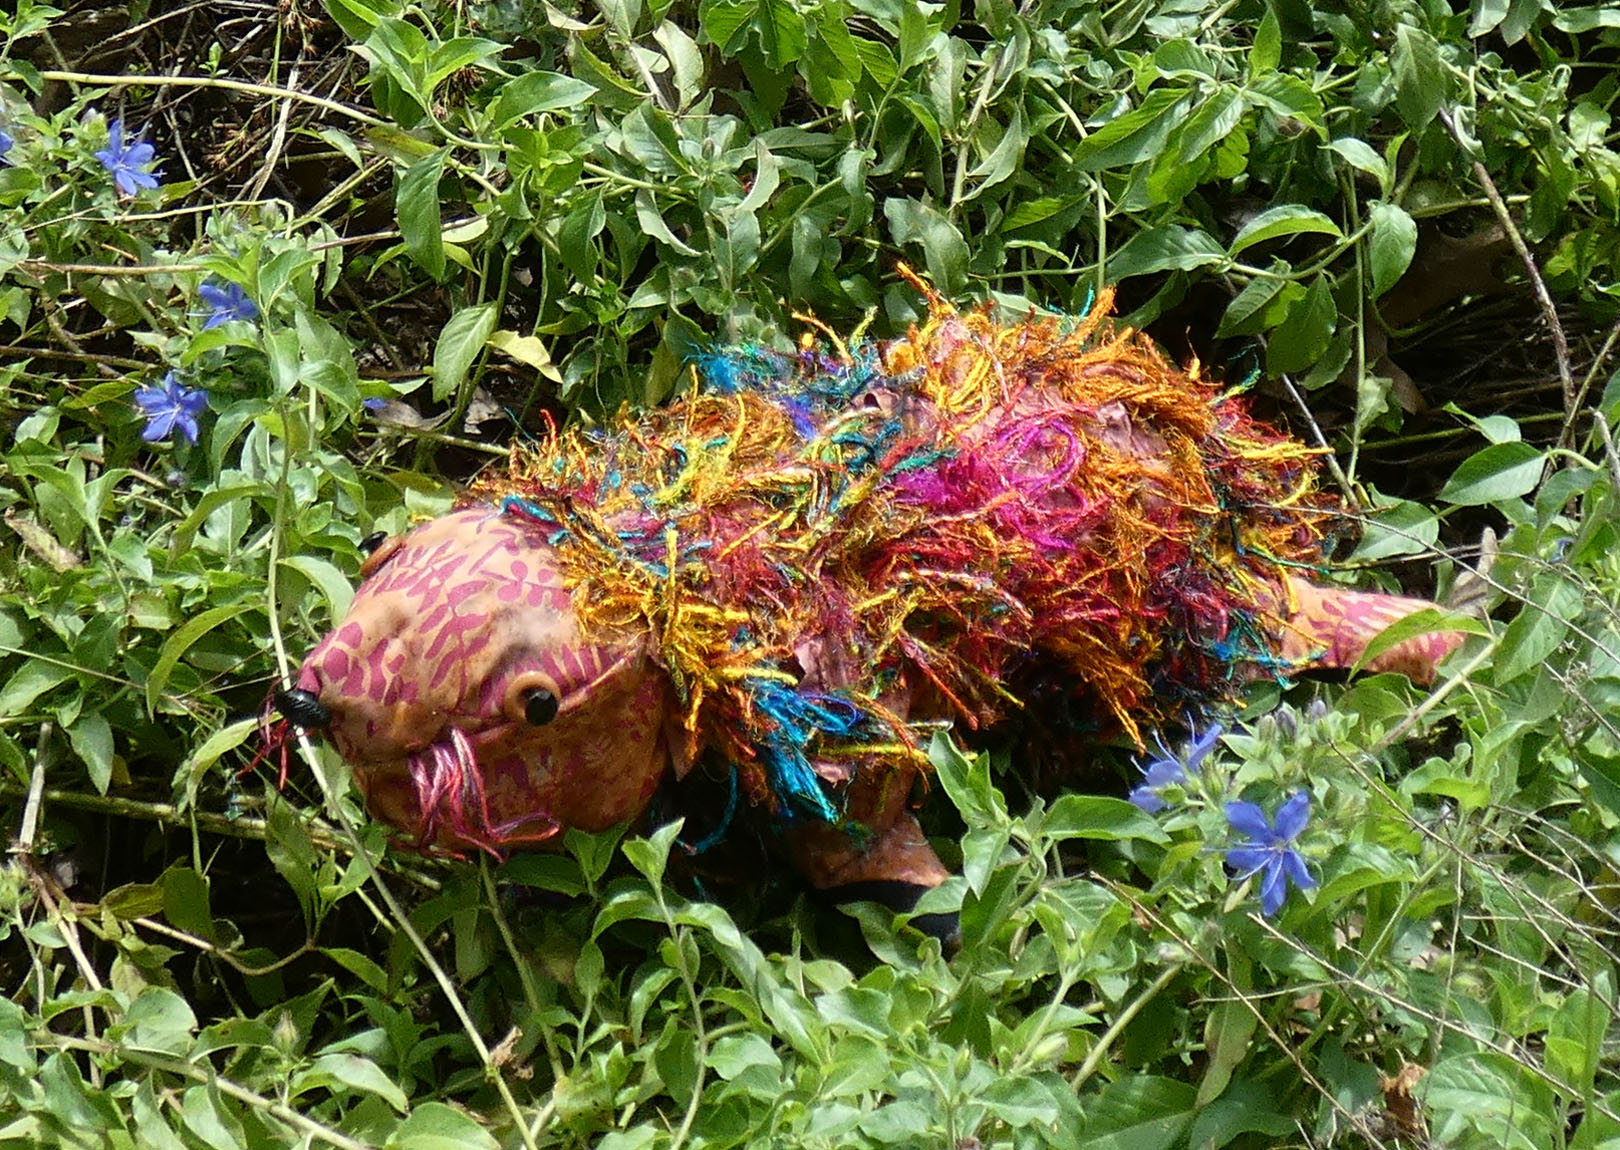 |
| No careers of animal sculptors were in any way threatened during my execution of this challenge. |
 |
| Beautiful recycled silk yarn. |
Technically this is not in any way quilted! I wanted to make a little quilt pond for the otter to rest in, but then my mom broke her leg and my sister got covid and life in general kept occurring! Most of the projects that I do for this group are ones that I consider maquettes or rough drafts, as IF I were going to complete a piece for a show. This otter is even more of a practice piece than most. But I am just glad to have my creature finished, and he is a very cheerful companion in the studio. And I hope you check the links on Bryony Rose Jennings and get some inspiration there!
Animal Kingdom: Henrietta
When the theme Animal Kingdom was chosen, I spent days trying to figure out what to create. This happens with each theme. I think I need to do something on a grand scale - it takes me a few days to come to my senses. I considered quite a few different animals - the blue-footed booby almost won out (because they are so darn cute!). In the end, I went with a humble chicken. Ms. Henrietta, however, is anything but humble. Once I settled on this idea, I had a little fun.

My inspiration for Henrietta is the Polish Chicken, those chickens with the crazy head floof. They bring a smile to my face whenever I see them (I think I might look a bit like that when I get up in the morning). It all began with the black and white improv. My plan was to make the head floof black and white, too, but that was not to be. In order to do that, I needed to find my Sulky Water Soluble stabilizer, which I had tucked away in a spot I was not likely to forget - heh heh. I'm still looking for it!
The head floof (I don't know what else to call it) would have been made by using two pieces of water-soluble stabilizer, a base piece of fabric, and trimmings from cuttings. The trimmings are piled atop the base fabric, then that is sandwiched between the two pieces of water-soluble stabilizer. Then you sew it down with a thread that matches the trimmings, sewing over and over, until you feel that the trimmings are well-anchored to the base fabric. The last step is to wash off the stabilizer and let it dry.
I used raw-edge appliqué for the entire piece, matching the thread. For the body, I stitched around the outline, then stitched vertical "feather-like" lines in the body and tail. You can't really see them that well, but here's a little peek.

For the head floof, beak and waddle, I just did a simple outline stitch in matching thread. Henrietta has eyes under that floof, I'm pretty sure, but she didn't bother to let me fuss with them.
Here's a photo of that floof, up close.

She has quite the floof, doesn't she?! I told you she wasn't any ordinary chicken! Haha! The trimmings are from the cutting for my Postcards from Sweden quilt; I couldn't bear to throw the trimmings away, they were so bright and fun. Who knew that I needed to save them for Henrietta?
I pondered how to quilt her. In the end, I decided to use the same quilting idea as I did for my Sundance the Rooster quilt (I'll link all of these past quilts in my other blog post). Just simple rays behind her, to show her off a bit. I wanted to main focus to be on her.
For the backing, I used a piece of bright blue Grunge. You can see the quilting a bit more from the back view.

Henrietta measures 16" x 20". All of the fabrics are from my stash. This was such a fun theme, once I figured out what to make!
Wendy
Subscribe to:
Posts (Atom)