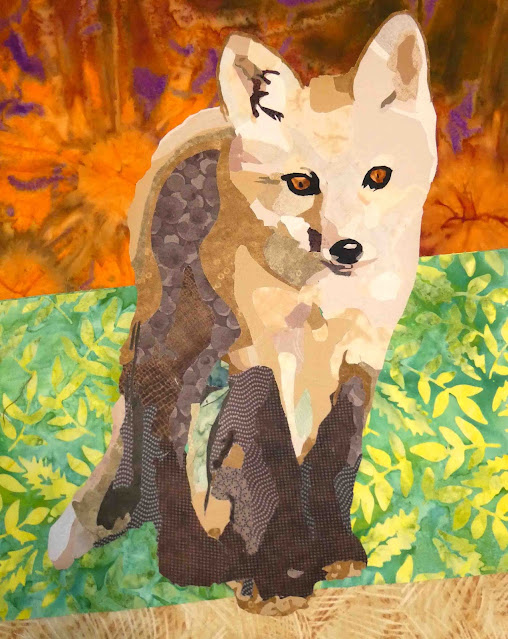
The prompt, "Animal Kingdom," was my submission. I wanted to make a quilt from this original photograph taken by my friend from high school, Carol Galloway. This is Carol's original photo.
While I was making the quilt, I shared my progress with Carol. This is what Carol told me about her photo:
I recognize this little one!! This den had 11 kits last year, in a field owned by a cemetery. But, they did not come back this year. I stop by once a week just to check since foxes are known to change natal dens from year to year, and to move their kits around as they get bigger.
Okay, so this is how I made my quilt. I first cropped the image to fit my large format printer paper. I use an app called VectorQ to create an image easier to work with for my purposes, creating delineation between shades of color. When I printed it, it looked like this:
For this project, I was trying out a new product. I've always used transparency sheets...the kind used for overhead projectors...and that has necessitated taping them together to make them large enough. This time I used some plastic sheeting, available at JoAnn and probably other craft outlets. It comes in different weights, and I chose the heaviest weight available at JoAnn the day I went shopping. The photograph is taped down to my work surface, and then the plastic sheeting taped over the top.
Then, I go to work tracing, using a fine tip Sharpie. Sharpies are the only pen I've found that won't smear when applied to plastic.
I always write "right side" on the traced image. Since I'm doing fusible applique, I want to remember to trace on the opposite side since I'll be producing a mirror image of the piece I'm working with. Then, I turn the template back to the right side for guiding placement of the fusible piece.
The fox was first constructed on a teflon pressing sheet. It allows me to fuse the pieces down. When I'm finished, it can be peeled off the pressing sheet and applied to the fabric background. Tweezers are an essential tool since some of the pieces are very tiny.
Here are some details.
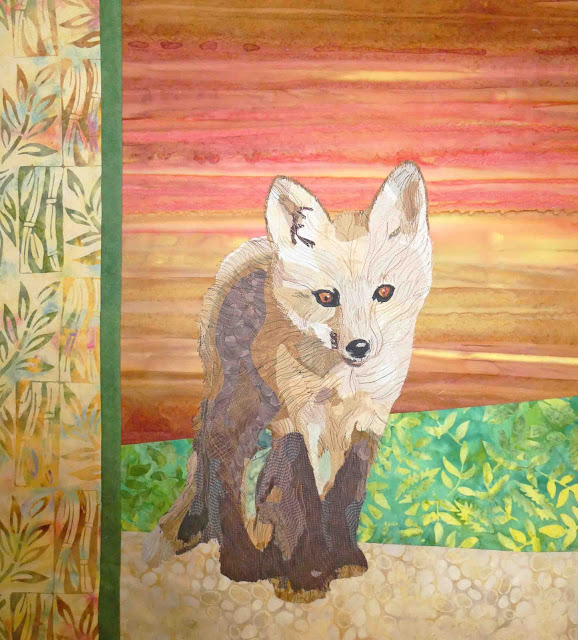
I quilted some mountains and a sunset in the background.
And here is my finished quilt. I'm calling it "Fox Trot," and it finished up at 24 x 22 inches.
He was then thread-painted using these threads.
The thread painting is done through the quilt top and the batting.
Whiskers were added last.
When that part was finished, I add the quilt back for quilting, and used these threads.


That is absolutely amazing! What a gorgeous quilt - you make it look so simple!
ReplyDeleteThank you, Wendy.
DeleteWow, what a fantastic job! Thank you for sharing your process with us. It was so interesting to see how this little character developed.
ReplyDeleteThanks, Catherine!
DeleteThis is gorgeous, a true work of art! It would have been great even if you stopped at the applique stage but the thread painting adds so much detail and dimension. I always want to do thread painting but I am always afraid I am going to ruin whatever I already have. :) Could you tell me what weight those threads are?
ReplyDeleteThey're mostly 50 weight cotton threads. There are some good books on the market about thread-painting. I'm self-taught from books. It is scary, but it's also very forgiving.
DeleteGreat piece. I loved seeing your process.
ReplyDeleteThanks!
DeleteI love Fox Trot. He looks so real. Thanks for sharing your technique. You made what was complicated seem easy. You are very good at picking right fabrics.
ReplyDeleteThanks! It helps to have lots of scraps!
DeleteThis is an incredible piece of workmanship and the final piece is stunning. I was very interested to see how you built up all the layers on the teflon sheet :)
ReplyDeleteThank you Janine.
DeleteHe is gorgeous!
ReplyDelete