Sunday 4 August 2024

New Theme

A big thank you to everyone who linked up 'Vintage' quilts. It was, as usual, a wonderful collection. It's always interesting to me how each of us interprets the same prompt differently. 

And now, it's time to choose another theme. There are just two options remaining:

Spices and Mosaic. I decided to do it by coin toss. 

Heads = Mosaic

Tails = Spices.

So, I flipped an American quarter and came up with...


If you're not familiar with American coinage, this is definitely tails. So our next prompt will be 

Spices.

The Reveal Day will be 1st November at 10.00 GMT. In the meantime, you are always welcome to post anything related to this theme or art quilting in general here on The Endeavourers.

Good luck, and Happy Sewing!

Thursday 1 August 2024

Vintage Bouquet

For this challenge, I used lots of small vintage textiles, such as napkins and handkerchiefs.  For previous themes, I have used them in their natural state (white, cream, and pastel), but this time I spent two days painting them with diluted Setacolor paints. Cheryl Sleboda had written an article for Quilting Arts magazine in 2014, about getting the effects of dye with these paints, and I really like her method.

 After heat setting, I cut out shapes for baskets and flower petals.

When possible, I used the already-finished edges of the textiles to provide decorative details.  Where I had to cut into them, the acrylic paint kept the edges from raveling, and it also gave those pieces enough body to stand out dimensionally from the background.  I cut some motifs from old lace pieces, and also made origami-style flowers to "fill" five baskets.

Then I appliqued everything to a quilted black background, which reminds me of an old tole-painted tin.


Vintage Bouquets


The filet crochet and hem stitching on this vintage cotton napkin make interesting details on a flower basket.


These stems were cut from an old handkerchief, and then I added embroidery and flower buttons.

The pink flowers were cut from a damaged commercial doily, and the yellow-orange flower was made from an old collar.

I am very happy with this piece.  Back for our fourth challenge, Improvisation, I also attempted to make a bouquet, with fabric paints on a vintage linen, but I think this current piece is much more successful.

A similar subject, November 2018.


Using the paint as a thin wash, instead of in thick blobs, made the fabric much easier to handle and stitch through. It's hard to believe they all started out dull white, even stained.  Now they are the colors of my McCoy pottery collection!

Vintage pottery in soft colors.

And okay, I do not understand this blogger platform and how to publish!!  It tells me my location is in Australia, so I set it to publish at 10 am on Aug. 1, Australian time -- or so I thought!  Instead it was apparently scheduled for Texas time (where I actually live), so now I am publishing way late.  I try a different procedure every quarter and it never works. Sigh.

To see more views, and to read about all the resources I used, you can check out my home blog at textileranger.com.


Getting Shirty

 I mulled over lots of different ideas for this quarter's theme - Vintage - from replicating vintage patterns to trying out the vintage technique of Manx quilting but in the end the (re)discovery of these in my cupboard decided the project for me :)


I bought this set of hand-stitched hexagons several years ago at a Craft and Vintage fair, with no idea of what to do with them. In all honesty, I think that I felt a bit sorry that someone's work had ended up on a stall selling all sorts of odds and ends, so rescued them to leave them hanging about my cupboard for years! 

There is also a rather large bag of loved, but now redundant shirts in my cupboard.


So, I had a rummage through to see if there was anything that might work with the salvaged hexagons and found these. 

There were 15 hexagons in the original set purchased, but I whittled them down to 6 that were compatible in colour and also quilting cotton weight fabric. There were a couple that seemed to be made with heavier furnishing fabric that were very easy to dismiss :)

It was hard to tell exactly when the hexagons were created from the papers used, but it looked like it might have been in the early 1980's or possible even earlier in the late 1970's, so I reckon either of those definitely qualifies them as vintage! The shirts used in the blocks are not nearly so old, but as vintage in fashion can be as little as last season, I reckon they qualify too :)


I went with a traditional layout for this quilt as you can see. I know that this has ended up bigger than our usual art quilts and, indeed, is very far removed from the idea of an art quilt but I really wanted to make something that would give the hexagons a new lease of life. In a further nod to the notion of vintage I wanted to end up with something that was useful as well. 


 After cutting the blocks I was left with these pieces from the shirts so, in true vintage quilting fashion, I pieced them together randomly to create a backing for my hexagon quilt.

I didn't have quite enough shirt fabric left over so supplemented the pieced backing with strips cut from an old pillow case.

The blocks were shadow quilted around the edges and the hexagons were quilted with a zig-zag stitch around the outer and inner rings.


As you can see the quilt is not quite complete as I have not yet added a binding. I have struggled to find another shirt in a colour that will work for the binding so might have to broaden my search :) 

I hope to donate the finished quilt to Project Linus as I think that would be a fitting outcome for these vintage hexagons, don't you? 

Looking forward to seeing the results of my fellow Endeavourers vintage projects.


Vintage: Pretty Posies

 Coming up with an idea to use for vintage took me awhile. I ran through a gamut of ideas, none of which seemed to feel right. In the end, I pulled out vintage fabrics and just played around a bit. 


All of the fabrics used in this little quilt are vintage, dating back a couple of decades or more, with the exception of the backing. 

The background fabric is part of a sleeve from an old (and well loved) denim shirt of my husband's. I decided to leave it in the "sleeve shape" because I thought it added a fun twist to the quilt, and it reminded me of a window view for some reason. 


The "table" is a piece of fabric that I remember as a dress for my mom. It is a little sheer with little nubs of thread throughout. I'm not sure what type of fabric it is. 

The vase is from my stash of my grandmother's fabrics. It is cut in a hexie shape, although it is a very wonky hexie, as you can see. I'm not sure who cut the shape, that is the shape I found it in. 

The crocheted lace was made by my grandmother. I've been looking for a chance to use that in one of my quilts, so I'm glad it worked in this little piece! 

The posies, or flowers, are cut from a vintage handkerchief that came from either my grandmother, my great aunts, or my mother. I cut around the flowers and then machine stitched them to the quilt. 

I attached each little piece by raw edge applique with my sewing machine. The trickiest part was stitching around the flowers, and getting them overlapping the lace just so. It all worked out well and went together quickly. 


I kept the quilting very simple and subtle. I stitched straight lines 2 inches apart, then added a serpentine stitch in between. I used Aurifil 50 wt thread in Dove Grey (#2600) for the quilting. 

For the backing, I had this piece on my shelf. I bought this fabric a few years ago for a specific purpose. Since I can no longer recall what that specific purpose was (can you relate??), it has been used for backings. 


I finished the little quilt by binding it with more of the denim shirt fabric. The fabric is so well worn, it was very soft and easy to stitch through. 

So that's what I came up with for the vintage challenge - using vintage fabrics in my stash! I look forward to seeing everyone else's challenge pieces! 

Wendy

"Vintage" Reveal: Tin Cup Store

Way back in 2019, hubby and I went ATVing in Colorado for the first time. We stayed at Taylor Park Reservoir. One of our rides took us to the almost-a-ghost-town of Tin Cup, Colorado. Getting off our ATV's, I was immediately smitten with the rustic Tin Cup Store and I took this picture.

Almost right away after returning from that trip, I started wanting to render my photograph into fabric. In the intervening years I’ve thought about how to do it. When the most recent list of prompts was announced and “Vintage” was among them, I knew Tin Cup Store’s time had come. Here is my finished quilt:

This is what Wikipedia tells us about Tin Cup, Colorado:  

In October 1859, prospector Jim Taylor panned some gold from Willow Creek, and carried it back to camp in a tin cup; he named the valley “Tin Cup Gulch.” For years the area was the site of seasonal placer mining, but no year-round communities were established, partly because of the danger of Native American hostilities.

In 1878, lode deposits were discovered in the area, and the town of Virginia City was laid out in March 1879. By the 1880 census, the town had a population of 1,495. As Virginia City, it was incorporated in August 1880, but confusion with Virginia City, Nevada, and Virginia City, Montana, caused the residents to change the name. The town was reincorporated in July 1882 as Tin Cup.

The town population declined when the mines were exhausted. The post office closed in 1918, and the last town election was held in 1918.

 Here's an image from when the store was still operational.

(Image credit: "Tin Cup store and gas station" by peterichman is licensed under CC BY 2.0.)

Although some sources claim Tin Cup Store is still open during the summer, I have my doubts about that. When we visited in 2023, the doors and windows were boarded up, and it looked completely abandoned. If you're interested, a photo gallery of the area can be seen right here

Rendering the photograph into fabric presented some challenges. The first challenge was choosing fabrics I could use to create the scene, while simultaneously maintaining my sanity. I’m sure I purchased more fabrics than the ones shown below, but these were the ones selected to complete my project.


Starting out, it made sense to create the peak of the roof and its shadow first. From there, I could created the sign and the vertical board siding, tucking the “boards” under the shadow of the roof as I went. When I was finished with the first day’s effort, I had it this far:


It took several days, but eventually, I had it finished from side to side.


The horizontal board siding had its own set of challenges. For one thing, there were some important details that I could not possibly accomplish at this small scale. I gave it a lot of thought. I could leave it off, but these particular details gave the building its character. They seemed necessary ingredients to really capture the spirit of the place. And so I printed this small section onto fabric and cut out the detailed pieces I wanted…the elevation of the place at 10,157 feet. Also, the address number and the “Tin Cup Store” sign cut from license plates. Just below it, can you see the “Tin Cup” name created with horseshoes? Cool, huh? And finally, the license plate off to the right. They were cut out and fused like any other applique.


The sign on the log was embroidered using my machine’s triple stitch.


The screen door gave me pause. How could I create a screen from fabric? Eventually, I decided to add tulle over the top of the inner door pieces to create the suggestion of a screen.


There were a lot of pieces and layers, and so I created it separately, then peeled it up and fused it to the whole.


When it was all finished, it looked like this. I just needed a background.


A fabric for the gravel driveway and a woodsy background were selected and pieced together, and then the store was added.


It was quilted pretty simply. I first stitched down all the individual pieces, and then added some meandering in the gravel for texture.


To finish off the background, I added a sort of swoopy branchy thing around the trees.

A green binding was added, and it was finished. It ends up at 18 x 22 inches.


I’m pretty happy with this quilt mainly, I think, because I love the place. Somehow rendering a scene into fabric brings another dimension to what was once just a two-dimensional photograph. It seems to awaken memories in the way a photograph cannot. It occurs to me that it is the attention to detail that evokes memories, but I’m only guessing. Here’s how it looks from the back.

This was a fun project for me, and the fulfillment of a creative dream. I hope you've enjoyed learning a little about Tin Cup, Colorado, and I hope you like my quilt.

A Sad Little Horse


I didn't mean for this little horse to look so downcast but it is reflective of my making during the last quarter. From September, I hope I will have more time as my childcare days will start at 12 noon instead of 8 am and I should have finished quite a big garden project, which has taken a lot of time...


For today's reveal, though, I just have a simple offering. I have been wanting to use this vintage embroidered tea cosy (I assume it's a tea cosy but it's really too thin to use as one) for a long time but I haven't wanted to cut it and the awkward shape has always ended up putting me off.


Finally, it's time has come!

I am looking forward to seeing what everyone else has made this quarter :)

How old is Vintage?


Isn't it funny when you have a themed piece to create it seems the topic "Vintage" seems to seep into everything creative you have in mind or are working on? Do you find that too - suddenly everything you look at making is an opportunity to explore the theme? 


When "Vintage" was first picked I imagined a sewing room with a tailor’s dummy and a quaint desk with a featherweight sewing machine. Then I imagined a vintage typewriter which brought me to these expensive digital typewriters. I really like the yellow one! 


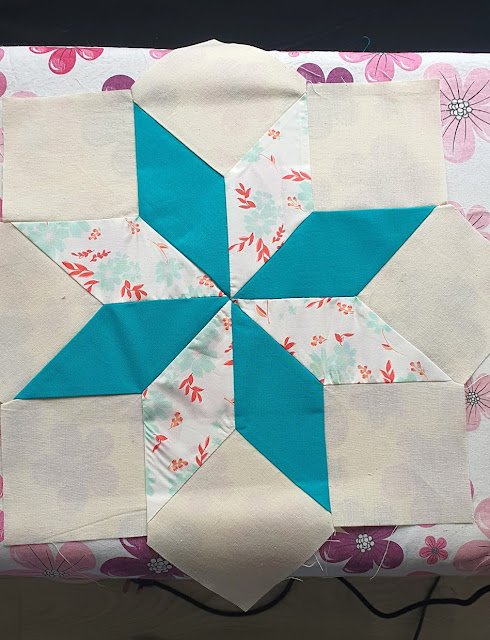
Too many thoughts and sketches living as only sketches until I saw a workshop advertised "not for beginners". That caught my eye and curiosity got the better of me. River of Dreams is an annual quilt exhibition held in Limerick, Ireland and for the last two years the organisers have provided workshops in the middle weekend. This year there was a two-part workshop - drafting in the traditional method of graph paper with pencil and compass on the Saturday and making the design on the Sunday. The class was led by Emer Fahy, and she brought us through the drafting and construction of the LeMoyne star in her design of a 28" block. 

I thought this could be a fun way to look at Vintage. How old does something have to be to be vintage? Google tells me 20+years but less than 100 for vintage and over 100 is antique! Barbara Brackman has the LeMoyne star design going back as far as 1894 so maybe this is not quite vintage but older again.
What I didn't know is that this type of block is based on a circle and doesn't evenly divide into an evenly spaced grid. Rather the diagonal measurement of the corner blocks equals the width of the two centre diamond points. That's what makes the drafting of it a little bit more complicated than an 8-pointed sawtooth star made from Half square triangles. Sewing it together is all Y-seams. 

Emer added a mitred border to up the difficulty level with more Y seams so this was a get as much as you can done in a day and finish it at home type of project.


Selecting material with vintage in mind I went straight for calico - that cream speaks of olde worlde to me and the little flecks in the fabric add character. Whenever I think of vintage photographs or books I think of a yellow tone to the whites and a sunny washed our effect on the colours, so I was trying for that in the pinks and blues with the creamy calico.


Instead of having a border same colour either side of the accent colour as in Emer’s design of pink-blue-pink, I changed them up to give a bit more room for the centre star using inner border as background fabric and then the blue to frame the design with pink leading into the colour change. In the second border I used background fabric with pink as the inner colour to frame the pink stars.

This finishes quite big, and I was a bit stuck on what to do with it. I don't have anywhere for it as a wall hanging and was thinking of making it into a bag to carry a cutting mat and ruler but at 28" it’s a bit big for my 5ft nothing height! I think it needed to become the medallion in a bigger quilt. Do your pieces talk to you sometimes like that telling you what they want to be?
 
So, I went medallion hunting and bought a few books(from the 1980's so I think these count as Vintage too!), lost hours on Pinterest and the Quilt Index looking at some really old quilts and came to my senses and remembered to keep it simple. 
 
Sticking with 45-degree angles that the LeMoyne star is based on I decided on square in a square and flying geese.
As this has turned out quite a bit bigger than intended, is now going to be a 70" quilt  and I changed my mind on the colouring, I didn't get it finished but I hope you enjoyed hearing about my exploration of Vintage - I certainly enjoyed learning new skills and letting my curiosity follow where the theme led. 

So I'll leave you with two vintage quilts of Emer's that she brought for show and tell, no idea who the makers are only that they are vintage Irish quilt tops.


 I honestly did not know what to do with this theme. I thought about vintage fabric or lace but don't have any. I decided that I did not want to do a vintage block. So I found a quilt I did several years ago from classes I took doing vintage sewing techniques. Here are close-ups of the the blocks.