
For these theme, I decided to explore the use of tea bags and layering with fabric. Inspired by tea bag art by Carol Ann Webster, which I had seen on Pinterest, I saved up some of my tea bags and got to work. I don't have a large variety of fabric types in my quilt room, since I mainly work in cotton. However, I did have some linen-like fabric scraps, and just enough for this project. I decided that each of my pieces should have a tree. Initially, I had thought to do a four-season piece, but changed my mind as I went along.
The first step after emptying and cleaning the tea bags was to sew them to the linen-like fabric. I did this with a basting stitch in a light thread. My plan was to remove the basting stitch when the block was complete, but in the end I opted to leave it in as added texture to the piece.
My first little tree is a short little thing, and I'm not sure why now I thought I needed to make it so small. I find it interesting how each tree turned out and still managed to have a symmetry when the quilt was finished. The first tree was cut freehand; with the other two, I roughly sketched out the tree on the wrong side of the fabric and then cut it out. The same fabric was used for all three trees. I used a glue stick to secure the pieces before stitching them down.
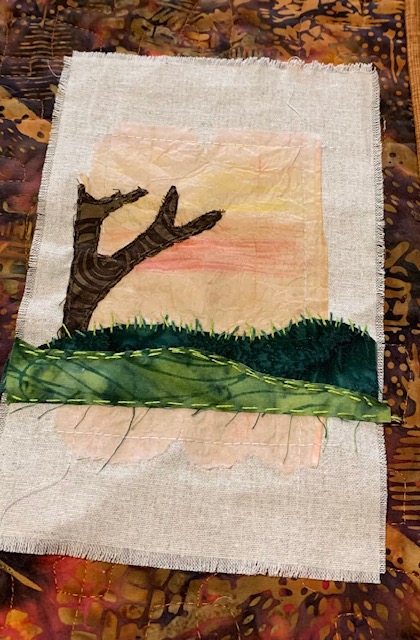
On each of the tea bags, I very timidly used Inktense pencils to add some definition to the sky. I hadn't used the pencils before, so I was being careful. It will be fun to play with them a bit more in other projects. On this first block, I added yellows, orange and reds for a sunset look. I purposely left the fabrics hanging over the edge of the outer piece, as well as let the fabric fray. For the stitching, I used embroidery floss and just stitched what I thought would work. Once the block was done, I frayed the edges of the block just a bit, again to add more texture.

My second block gives a little nod to "Up North" in Minnesota, where trees sometimes grow between moody black and gray rocks. Lake Superior presides, along with a few gulls gliding in the air.

The center block was the most difficult tree to come up with. If I had added some stitching to make this trees branches look fuzzy, it might be a Joshua tree, so I gave it a desert sunset look.
Once the blocks were finished, I pulled fabric and batting and made a quilt to hold the blocks. I found this batik in my stash that has a design with houses and trees, and thought that would be a fun backdrop.

I quilted it with a square-ish meander, which you can see best on the quilt backing.

Once that was done, I bound it and got ready to place the tea bag blocks on the quilt. I debated about how to attach them. I considered an "X" in each corner, or a button, but I wanted them secured a bit more than that. In the end, I opted for a running stitch in a color that coordinates with the background fabric.

And with that, my little piece was finished. I enjoyed playing with the tea bags as part of the blocks, and will try more of it in the future.
Wendy
This turned out great, Wendy! I love your little trees. Great backing fabric too.
ReplyDeleteThank you. Now that I know how the tea bags work with fabric, I may play with this a bit more. It was an enjoyable project!
DeleteWhat a lovely piece - it must have a great texture. I'll have to try the teabag technique!
ReplyDeleteThank you. It was fun to layer the pieces and stitch through them. Next time I'd like to add beads, buttons, etc.
DeleteCute and very innovative.
ReplyDeleteThank you. I enjoyed the process.
DeleteIt is so calming and evocative of being outdoors, catching your breath while watching a sunset!
ReplyDeleteThank you! I enjoy nature scenes.
DeleteThese tiny blocks are beautiful Wendy, I love how simple they seem but how evocative they are. Each one is a perfect little snapshot of a moment in time.
ReplyDeleteThank you! I don't do much of this type of stitching, so it was a good experiment for me.
DeleteLovely idea and I really the colours you have chosen for each piece - flows so nicely one to the other.
ReplyDeleteThank you, Ruth! I enjoyed the process.
DeleteI would never have thought of using tea bags. Each tree picture is really beautiful and they look lovely together on that backing :)
ReplyDeleteThank you, Janine! I had to chuckle a bit at how small my first tree is, but it all worked out!
Delete